The following guide is intended for advanced operators, understanding TPLink routers is required or you may break your current/working configuration!
This guide provided as is, we don’t provide support for it.
Since Version 11 of TP Link 841N, configuration of this device has become more complex than the previous version. There is a workaround however, with which you can apply a v10 OpenWRT to the device. Below you will find a detailed explanation. Please be warned that by following these instructions you are likely to lose the warranty for your product. If steps are not followed properly, you might find your router unaccessaible or bricked. Please proceed with care and with your own resposibility.
1. Apply OpenWRT V11 to the router
First you need to use tftp to change the router’s factory firmware to that of OpenWRT. To do this, you need to use tftpd.
1.1 Please plug in on your router`s power supply and connect your computer`s LAN port to the Router`s LAN1 port.
1.2. Please download and install tftp32 or tftpd 64 to your computer. (32 or 64 depends on your PC. We used the software „tftpd by phi jounin” v 4.00 for this guide) Please also download „openwrt-ar71xx-generic-tl-wr841-v11-squashfs-factory.bin” from our website: http://www.hotspotsystem.com/firmware/openwrt/TP-LINK/tplink-tlwr841/
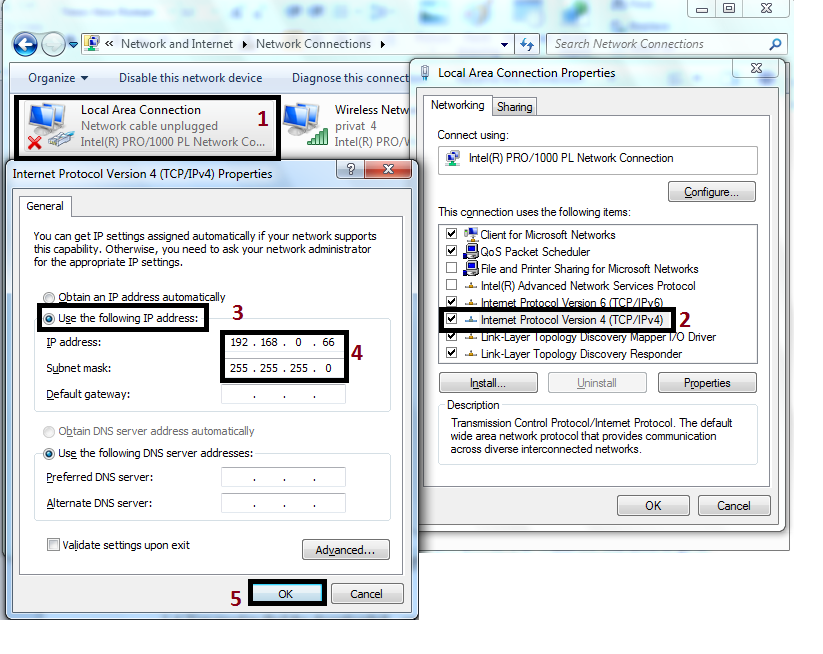
1.3 You need to set your PC’s IP address to a static one during the process. This has to be 192.168.0.66. (subnet mask is normally 255.255.255.0). For Windows, you need to go to Start Menu / Control Panel /Network and Sharing Center / Change adapter settings / Properties / TPC-IP Protocol v4 /
1.4 You need to find the downloaded „openwrt-ar71xx-generic-tl-wr841-v11-squashfs-factory.bin” firmware on your local computer’s drive and need to rename it to „wr841nv11_tp_recovery.bin”. Please leave it in the same folder. (It is the “Downloads” folder by default).
1.5. Open tftpd32 (or 64). Set the „Current directory” to your download directory (it should point to the folder where the firmware was downloaded to). In this example it shows as „C:\Users\x60\Downloads” but this might be different in your case. You can leave the „Server Interface” as it is by default. Do not close the application. You can follow the process soon to commence by clicking onto the Log Viewer tab.
1.6 You need to start router in tftp mode. To do this, please hold down the reset button while you press the turn on button and keep it being pressed until the „lock” LED turns to green. This completes the tftp section of this guide. You need to find similar message at the log view of tftpd as seen below. (Once the process is successfully finished, you may close tftpd.)
2. Revert OpenWRT v11 to v 10.
In order to have a graphical user interface to the router, the firmware has to be reverted to v10.
2.1 Please connect your router`s WAN port to the Internet and leave the PC – router cable connected.
2.2 You need to revert your PC back to get IP addresses automatically. Use 1.3 for reference and select: “Obtain IP address automatically”.
2.3 You need to use Putty to go through SSH. The IP address of the new firmware is 192.168.1.1, then click “‘Open” then “Yes” at the warning message. For “login as” use root (No password needed yet, please hit Enter).
2.4. Inside Putty, please run the following commands:
cd /tmp (Enter)
wget http://www.hotspotsystem.com/firmware/openwrt/TP-LINK/tplink-tlwr841/15.05.1-tl-wr841n-v10-sysupgrade.bin
(please wait while the v10 firmware is being downloaded)
sysupgrade -F -n 15.05.1-tl-wr841n-v10-sysupgrade.bin
Press Enter. this wil force-update the v10 firmware.
2.5 You need to wait approximately 2 minutes until the router reboots. The firmware change is complete. Please note that the new internal IP address of the router is 192.168.20.1. You may use the configuration setup of v10 from step 3 that can be found here: http://www.hotspotsystem.com/openwrt-hotspot-setup


Hi, thank you for this guide!
Any plan to support also v12? It’s becoming harder and harder to get hold of v10 and v11 routers…
For those with a Mac: your Mac comes with a TFTP server embedded, to activate it you just need to use the command:
sudo launchctl load -F /System/Library/LaunchDaemons/tftp.plist
More details here => https://rick.cogley.info/post/run-a-tftp-server-on-mac-osx/
Cheers,
Guido