It’s easy to customize the Transparent Skin and give a branded experience to your users.
Here’re the steps you need to customize the Skin by changing it’s background:
- Log in to the Control Center and go to Customize > Skins.
- Upload the background image using the Manage Images form.
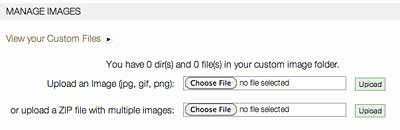
Use the Upload an Image > Choose File, then press Upload.Try to use an image which is at least 1280×2000 pixels because the registration page is long vertically.
- Click on the View Custom Files link. Your file should be listed there if the upload was successful.

Each operator has it’s own image directory on our server. Here you can find out where your images are located. There is a line:YOUR CUSTOM IMAGES IN FOLDER: /skinimages/your_operator_username/
Please note that your_operator_username is in LOWERCASE. Copy the path including the name of the image (/skinimages/your_operator_username/image.jpg), you will need it. When you copy the link, there will be 2 backslashes in the URL after your operatorID, so you will need to remove one when you paste it. Now click on Back to Skins.
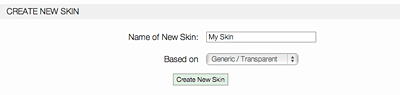
- Create a New Skin based on the transparent skin. You can do this in the Customize > Skins menu. Enter a name of a new skin, select Transparent as ‘based on’, then press ‘Create a New Skin’.
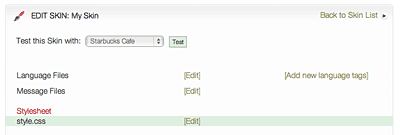
- Edit style.css. If you edit this Skin, you can find the Skin files. Search style.css and press Edit.
- Edit the background element of the css. Find this line:
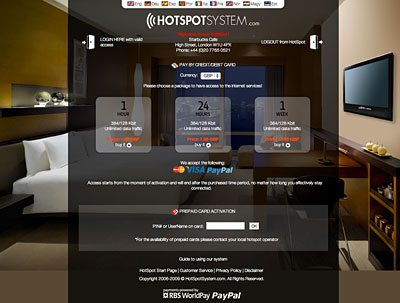
background: #24bfc2 url(/customer/customer_images/basic/tr_background.jpg) top center;
Replace the background color and the url. Path to your URL is what you have copied in Step 3 (your custom images folder). So after editing, the line should look something like this:
background: #564a34 url(/skinimages/your_operator_username/room.jpg) top center;
Where your_operator_username is your Operator Username in lowercase, and room.jpg is the filename which you have uploaded in Step 1 (case sensitive!). Try to choose a background colour which is similar to the background image colour.
Click on Save and Back to File List.
- You can test the Skin by using the ‘Test this Skin with’ option on the Skin Editor page.
- If you like the result, you just have to assign this Skin to be used with your location. Go to Customize > Skins and use the Assign link. Another option is to modify your location in the Manage > Locations > click on name > Modify Hotspot Data and click on Splash Page Settings where you can select your newly created Skin.
YOU’RE DONE!